Restoring your Ford 8N's 12-volt electrical system can seem daunting, but with a methodical approach and this comprehensive guide, you can get your tractor back up and running. This guide provides a step-by-step process, troubleshooting tips, and safety precautions to ensure a successful restoration. For additional resources, check out this helpful 8N resource.
Finding Your 8n Ford Tractor Wiring Diagram (12 Volt)
Before you begin any repairs, you need a reliable wiring diagram specific to your 8N's year and model. Online forums dedicated to Ford 8N tractors (like Yesterday's Tractors) are excellent resources. Compare several diagrams to account for potential variations. Remember, accuracy is crucial; using the wrong diagram could lead to more problems.
Checking Your Tractor's Electrical System
Before starting repairs, conduct a thorough visual inspection of your tractor's wiring harness. Look for broken wires, corrosion, loose connections, and any signs of previous repairs or modifications. Note any discrepancies between your physical wiring and the diagram. This initial assessment will provide valuable clues about the extent of the repairs needed. Did you know that approximately 75% of electrical problems stem from simple loose or corroded connections?
Safety First: Disconnecting the Battery
Always disconnect the negative (-) battery terminal before working on any electrical components. This prevents accidental shocks and short circuits that could damage your tractor or injure you. This is a non-negotiable safety precaution. Has anyone ever told you of a DIY project gone wrong because of ignoring safety measures?
Tracing the Wiring: A Methodical Approach
Carefully trace each wire, comparing it to your wiring diagram. Use a multimeter (a tool that measures voltage and continuity) to test the integrity of each wire. This step requires patience and a methodical approach. Mark any discrepancies between the diagram and the actual wiring. Remember, a thorough understanding of your tractor's wiring is 80% of a successful repair.
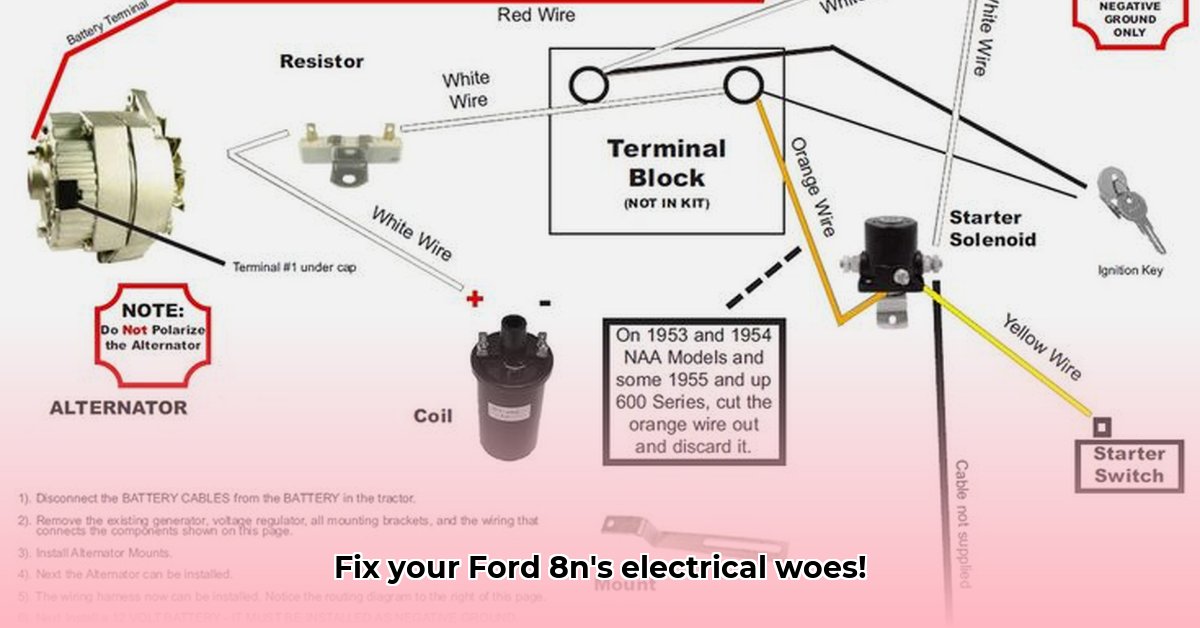
Identifying Components and Their Functions
Your wiring diagram identifies each wire's connection points to various components like lights, starter motor, ignition switch, etc. Understanding these connections is vital for diagnosing problems. For instance, a faulty ignition switch could cause starting issues, while a corroded connection might lead to intermittent lighting problems.
Repair or Replace: Assessing Damaged Components
Once you've located faulty wires or components, decide whether to repair or replace them. Minor breaks might be fixed with soldering and proper insulation, whereas significant damage necessitates replacement. Strive for clean, professional-looking repairs. Using high-quality replacement parts is just as important as proper installation.
Installing New Wiring: Best Practices
When installing new wiring, use wire of the correct gauge (thickness) specified in your diagram. Use appropriate connectors and ensure thorough insulation (electrical tape or heat shrink tubing) to prevent short circuits and corrosion. Never compromise on quality.
Testing Your Repairs: Verification is Key
After completing repairs, reconnect the battery. Carefully test every electrical component to ensure proper functionality. If issues persist, revisit each step of your process, comparing your work to the wiring diagram and using your multimeter to identify any remaining faults. Did you check all your connections after completing the repairs?
Leveraging the Online Community
Don't hesitate to seek help from online Ford 8N forums and communities. Experienced mechanics and hobbyists readily share knowledge and offer troubleshooting assistance. These online communities create a valuable support network for tackling complex repairs.
Common Problems and Solutions: A Quick Reference
The following table summarizes common issues and their potential solutions:
| Problem | Possible Causes | Solution |
|---|---|---|
| Lights not working | Burned-out bulbs, faulty switches, broken wiring | Replace bulbs, test switches and wiring with a multimeter |
| Starter motor won't crank | Dead battery, faulty solenoid, bad wiring | Charge/replace battery, check solenoid and wiring |
| Ignition system problems | Faulty ignition coil, bad wiring, points adjustment | Inspect coil, check wiring, adjust points (if applicable) |
| Electrical system malfunctions | Corrosion, loose connections, incorrect wiring | Clean connections, check all connections, replace wiring |
Troubleshooting Guide: A Step-by-Step Approach
- Visual Inspection: Thoroughly examine the wiring harness for damage.
- Wiring Diagram: Consult a reliable wiring diagram for your specific tractor model.
- Component Testing: Use a multimeter to test individual components.
- Circuit Tracing: Trace faulty circuits, noting any breaks or loose connections.
- Repair/Replacement: Repair or replace faulty components, using high-quality parts.
- System Testing: Thoroughly test the entire electrical system after repairs.
Remember to always prioritize safety! If you're unsure about any step, consult a qualified mechanic.
12-Volt Conversion Considerations
Many upgrade their 8N to 12-volts. If you've done so, ensure your conversion was done correctly. Improper conversions cause substantial electrical issues. Always reference a reliable conversion guide.
Preventative Maintenance
Regular inspection prevents future problems. Inspect the wiring harness, test connections, and address small issues before they become major headaches. This extends your tractor’s lifespan.
Safety Precautions: A Final Reminder
Always disconnect the negative battery terminal before starting any repairs. Never work on a live electrical system. Seek professional help if needed. Remember that safety is paramount!